Showing posts with label pie. Show all posts

Friday, August 21, 2015

2015 Update and New Projects!

Hi Blog World,
It's halfway through 2015! Where does time go? Over the past two years there have been lots of changes: I moved to LA, I started running and completed 7 half marathons so far, and have tried to live a healthier lifestyle, which means FAR less baking... But I'm still baking for special occasions, or by request :)

Here are some recent baking projects that I've done:

Minion Cake for my nephew's 2nd birthday!
Harry - the newest minion?

Happy 2nd Birthday Harry!

Bridal Shower Cookies and Cupcakes for my dear friend's bridal shower! The theme was 'girly' so I went with pink, white and gold, and used lace as my inspiration.
Lace/doily hearts
More doilies
Strawberry Cupcakes with Vanilla Buttercream Roses

The sweet spread
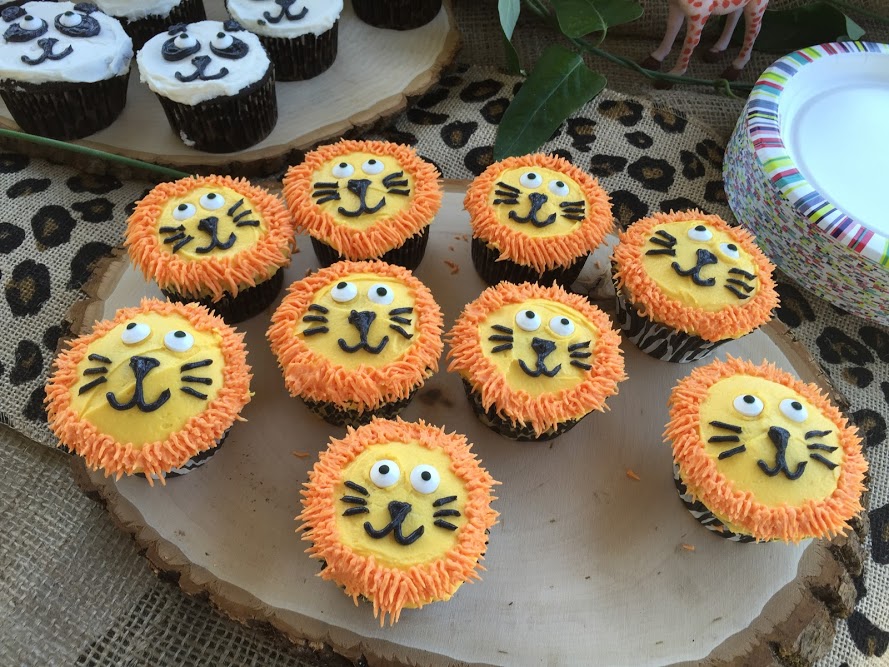
Zoo Baby Shower Cupcakes for my best friend's baby shower!
Lions and Tigers and Panda Bears, Oh My! (and Zebras!)

Lions!

Pandas!

Tigers!

Zebras!

The whole display!
Pies! My mom and I took a pie making class from the wonderful Kate McDermott (http://artofthepie.com/) and I've been practicing my skills!

Apricot Pie fresh from the oven

Mom and I with our finished pies!
Mom and I with the Amazing Kate!!

Triple Berry pie! (not enough egg wash...but still tasty)

Peach pie ready for the oven!


I have a couple more big projects in the coming month, which I'll be sure to document here. One bachelorette party, and a WEDDING CAKE! The special challenge with the wedding cake is that the wedding is in Oakland...and I live in LA...so there will be lots of travel/logistics involved. Stay tuned!!


Tuesday, March 16, 2010

Chocolate Cream Pi(e)


Hi. I know it's been too long. Please accept my apology for temporarily abandoning ship. I've been doing a lot of thinking about this blog and my commitment to it. See, I'm very much a team player. I play on a soccer team, I work on teams as a consultant, and this blog was once a team effort. But with changes in life, the team dynamic disappeared. No one is on the other side to keep me accountable, to prod me to make sure that I am cooking, baking, photographing, and posting. And clearly, left to my own devices, I stopped. But don't worry, this is not at all a eulogy to Pacific Thyme. In fact, it is very much still alive, if merely dormant. Consider this a revival. And consider this chocolate cream pie my peace offering (believe me, with one taste, all of your problems will melt away and you will forget that I once abandoned you).


March 14th, 3/14 is one of my favorite holidays. Yes, for those of you not nerdy enough to recognize, it is Pi Day! A day where, for each of the past 8 years, my friends and I have gathered to celebrate all things mathematical, and enjoy some delicious pi(e). And this year was no exception. In fact, this year was a revival of Pi Day, too! My wonderful best friend and Pi Day co-founder, Tracie, had to miss the last two Pi Day celebrations (something about a trip to Ecuador and living in DC...but I'm not bitter, I promise!). But this year, she has moved back to the beautiful SF Bay Area and was able to once again join in the party!


I was killing some time at home on Saturday night before Tracie came over for a pre-Pi Day sleepover, and I decided to whip up this beauty: Chocolate Cream Pie. This pie was surprisingly quick to make. In fact, the directions recommended that I bake the shell, take it out to cool and while the shell is cooling, prepare the filling. But the filling was so quick to make, that the shell had barely cooled a few degrees! The directions then said: immediately pour filling into cooled shell. What was I supposed to do?! Ignore the "immediate" direction and wait for the shell to cool? Or ignore the "cooled shell" requirement and just pour my hot filling straight on in? Now I know that this may not seem like a big decision, but this is a Cook's Illustrated recipe we're talking about here. They've tested every possible way to make this pie, and have given really precise directions. And here I was, debating on how to disobey orders in the way that would least screw up the pie! I opted to ignore the "cooled shell" and decided to pour the filling right on in, then plop the whole thing in the fridge to cool overnight. The pie turned out fine :) In fact, it was quite possibly the biggest hit of the Pi Party, aside from the quiches Tracie and Tony made.


Everyone had a great time at the Pi Party, and all 6 pies were eaten up. Here are some pictures of our more creative apple and berry Pi(e)s!


Chocolate Cream Pie
from Cook's Illustrated, May 2001

Crust
  • 16 Oreos with filling, broken into pieces (or whole if you have an awesome food processor)
  • 2 tbsp unsalted butter, melted and cooled
Filling
  • 2.5 c. half and half
  • pinch salt
  • 1/3 c. sugar
  • 2 tbsp cornstarch
  • 6 large egg yolks
  • 6 tbsp unsalted butter, cold, cut into 6 pieces
  • 6 oz. semisweet chocolate, chopped (they recommended Hershey's Special Dark, which I used)
  • 1 oz. unsweetened chocolate, chopped (I used Baker's)
  • 1 tsp vanilla
Whipped Cream
  • 1.5 c. heavy cream
  • 1 1/2 tbsp sugar
  • 1/2 tsp vanilla
For the crust:
  1. Adjust oven rack to middle position and heat oven to 350 degrees.
  2. In bowl of food processor fitted with steel blade, process cookies until crumbs are uniformly fine. (Alternatively, place cookies in large zipper-lock plastic bag and crush with rolling pin.)
  3. Transfer crumbs to medium bowl, drizzle with butter, and use fingers to combine until butter is evenly distributed.
  4. Pour crumbs into 9-inch Pyrex pie plate.
  5. Press crumbs evenly onto bottom and up sides of pie plate.
  6. Refrigerate lined pie plate 20 minutes to firm crumbs, then bake until crumbs are fragrant and set, about 10 minutes.
  7. Cool on wire rack while preparing filling.


For the filling:
  1. Bring half-and-half, salt, and about 3 tablespoons sugar to simmer in medium saucepan over medium-high heat, stirring occasionally with wooden spoon to dissolve sugar.
  2. Stir together remaining sugar and cornstarch in small bowl, then sprinkle over yolks and whisk, scraping down sides of bowl, if necessary, until mixture is glossy and sugar has begun to dissolve, about 1 minute. (Here I went from sprinkle to dump the whole bowl...it worked out fine)
  3. Whisk yolks thoroughly in medium bowl until slightly thickened, about 30 seconds.
  4. When half-and-half reaches full simmer, drizzle about 1/2 cup hot half-and-half over yolks, whisking constantly to temper; then whisk egg yolk mixture into simmering half-and-half (mixture should thicken in about 30 seconds).
  5. Return to simmer, whisking constantly, until 3 or 4 bubbles burst on the surface and mixture is thickened and glossy, about 15 seconds longer.
  6. Off heat, whisk in butter until incorporated
  7. Add chocolates and whisk until melted, scraping pan bottom with rubber spatula to fully incorporate.
  8. Stir in vanilla, then immediately pour filling into baked and cooled crust.
  9. Press plastic wrap directly on surface of filling and refrigerate pie until filling is cold and firm, about 3 hours (or overnight)


For the topping:
  1. Just before serving, beat cream, sugar, and vanilla in bowl of standing mixer on low speed until cream is smooth, thick, and nearly doubled in volume and forms soft peaks.
  2. Spread whipped cream over chilled pie filling.

Happy Pi Day!

Tuesday, December 8, 2009

Steak and Mushroom Pie

Hi. It's been awhile. I don't mean to ignore you, really, it's just that things are quite busy around here. It's December, which isn't really a surprise because Thanksgiving just happened. But Christmas is coming up - and I am totally unprepared for that. Oh well, I still have 16 days........

But enough about the future, it's time to reminisce about my trip. I posted about pub food when I was in London. Steak pies are just so good! The crispy pastry crust, the delicious warm steak and gravy filling...mmm I want another one as I write this. I grew up eating chicken pot pies, but never having steak pie. Why don't we do that here in America? Or am I in some weird steak-pie-free bubble in California?


In any case, ever since I got back, I kept thinking about them. All kinds of meat pies. Steak, lamb, chicken - there are so many options! So when I was looking for a quick, easy dinner, I knew immediately that I had to make one. And I'm not kidding: this was not only really easy, but quite good. Now, this isn't an elaborate pie. It could probably use some fresh mushrooms and some peas or carrots, and I think that next time I make it I might take some effort to make my own crust, but when you're looking for a quick and delicious steak pie fix, look no further.

Steak Pie
  • 1 tbsp vegetable oil
  • 1 pound cubed beef stew meat
  • 1 large onion, chopped
  • 1 (1 oz) package dry mushroom gravy mix
  • 1 c. water
  • 1 tsp Worcestershire sauce
  • 1/2 to 1 tsp salt and pepper (to taste)
  • 1 sheet frozen puff pastry, thawed
  1. Heat the oil in a large skillet over medium-high heat.
  2. Add beef stew meat, and cook until browned on the outside.
  3. Add the onion; cook and stir until tender, about 5 minutes.
  4. Stir in the mushroom gravy mix and 1 cup of water.
  5. Season with Worcestershire sauce, salt, and pepper.
  6. Turn heat to low, and simmer for 20 to 30 minutes.
  7. Preheat the oven to 400 deg F.
  8. Transfer the beef mixture to a pie plate.
  9. Roll out the puff pastry to cover the top of the plate.
  10. Press edges onto the rim of the dish to seal.
  11. Bake for 20 minutes in the preheated oven, until the pastry is puffed and golden brown.
I recommend serving this with some green bean casserole...mmmm!

Thanks for bearing with me while I get back in the groove. I have many more delicious things to share with you, so get ready, and be excited :)
-Erin

Tuesday, November 3, 2009

salmon pie


Better late than never right?

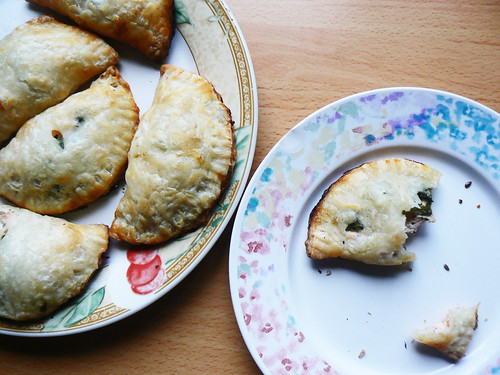
Let's see. I first made these to piggyback on the success of the peach hand pies. Basically I used a standard pate brisee (pie crust) recipe, and made up a filling involving salmon, cream cheese and basil. This follows my general philosophy with non-baking cooking, which I recently explained to David. It goes: put a lot of yummy things together, and something yummy will be produced. The nice thing about recipes like these is they are very forgiving, and there's much room for error.

I've made two versions of these pies. The original, which I will call 'regular sized', cut using the top of a four inch bowl, and 'minis', cut using a 2" round cookie cutter. For the regular sized, I had enough room to add a stack of fresh cut basil on top of the salmon filling. For the minis, I just topped with lots of dried basil.

I made these for the aforementioned brunch, and they were such a hit, poor Erin making french toast didn't even get one before they all disappeared. Now she can make them for herself. Or, if you live in San Francisco, you can make them, and bring them to her.


Salmon Hand Pies

This recipe isn't hard if you do some planning ahead. I like to make both the dough and filling beforehand and just assemble/bake when I'm ready. It might be helpful to read the novel I wrote regarding peach hand pies. The risks, fears, and techniques are the same. The payoff may just be better.

Basic Martha Stewart Pate Brisee (pie crust dough)
2 1/2 cups flour
1 teaspoon salt
1 teaspoon sugar
2 sticks butter
ice water

Salmon Filling
4 ounces salmon (about 1 fillet)
4 ounces cream cheese, at room temperature
3 tablespoons butter, at room temperature
1/4 cup milk
fresh or dried basil to taste
salt
pepper

Egg Wash
1 egg
2 tablespoons water

To make Pate Brisee
1. Cut butter into pieces, return to fridge to cool.
2. Sift flour, salt and sugar into bowl. If you are OCD, you can chill this bowl too.
3. Add cold butter to flour bowl (which should be a big, big bowl.) Use your dough blender (!) to cut butter into flour until pea (or nickel) sized pieces of butter are still visible.
4. Slowly add ice water (by tablespoons) to flour and continue until clumps of dough form. Begin working with hands to bring dough together.
(If you feel like the dough is not coming together, add more water. If you try a few times and it starts getting warm, take a breather and return the bowl to the fridge. Do not warm up that butter.)
5. After dough forms into a ball, split into two pieces and wrap in plastic wrap, form into discs and return to fridge to cool for at least 30 minutes.

To make salmon filling
1. Cut salmon into small cubes, about 1/4 inch dice. Set aside.
2. Add milk, cream cheese, and butter to a small saucepan. Heat over low heat until cheese and butter melt into milk.
3. Add salmon, basil, and salt and pepper to taste. Heat for about two minutes before removing. It is fine if the salmon is not cooked, since it will still be going in the oven.
4. Remove mixture to bowl, cool, cover and refrigerate. I usually do this overnight, but several hours should be fine. The mixture will be semi-solid.


To assemble
1. Remove one disc, and on a heavily floured counter, roll out to 1/8 inch thickness. If you want to be successful here, just add tons of dry flour to the top and bottom of your disc. It doesn't hurt your dough.
2. Use something with a four inch diameter to cut rounds out of your dough. I used a little cereal bowl. Or, you can cut squares and fold along the diagonal like turnovers. Transfer your rounds to prepared parchment lined cookie sheet and quickly return to fridge to chill 30 minutes.
3. Scoop salmon filling onto dough rounds, wet half of the edge with water and fold to seal. Indent edges with fork if you're into cute stuff like that. Chill.
4. Brush pies with egg wash. Cut a slit in each so they can breathe when baking.
5. Bake 20 minutes at 375 degrees.


Woo. This post everyday thing is hard. I need eaters to sign up! Who's free this week?

Nom nom,
Linda

Sunday, November 1, 2009

Apple Pie Bars

Happy November! November marks a challenge for us here at PacificThyme. It's NaBloPoMo: National Blog Posting Month. The deal is, you post in your blog every day for the whole month. That is 30 days of PacificThyme that you have coming your way! It will definitely be tough, but we figure that between the two of us, we just might have a shot at this.

This weekend, I went to San Diego to visit my friend Traci, a most awesome soon-to-be-pharmacist. As a pharmacist, Traci is really interested in the chemistry of cooking. Last time I visited her, we tried to make bread without using sugar, to mess with the properties of the yeast. Imagine that!

This time, Traci wanted something sweet. She gave up chocolate for 2009 as a personal challenge (she's crazy, right?!), but has been really successful so far! Not wanting to ruin her goal, we picked something sans chocolate: apple pie bars. The recipe said that it was the lazy girl's apple pie. That is definitely us. Especially when we were gearing up for a fun Halloween night on the town, we needed something easy but super delicious to take to a party. Enter apple pie bars.

Not only do you NOT have to make a fancy pie crust, these bars took only about 30 minutes to make. The hardest part was peeling the apples, and really, how hard is that? If you have 30 minutes, you could be enjoying some really delicious apple pie bars. Ok? Ready set go!

Apple Pie Bars

Crust
  • 1 1/4 c. flour
  • 1/3 c. packed brown sugar
  • 1/2 c. butter, softened
  • 1 tsp cinnamon
Filling
  • 8 apples, peeled, cored and sliced into thin pieces (we used granny smith)
  • 2/3 c. sugar
  • 1/3 c. flour
  • 1 tbsp cinnamon
  • 1/4 tsp ground cloves
  • 1/8 tsp nutmeg
Topping
  • 1/3 c. sugar
  • 1 tsp ground cinnamon (we ran out of cinnamon and used 1/4 tsp nutmeg instead)
  • 1 box (15 oz) Pillsbury refrigerated pie crusts (i know this is cheating, but i warned you that this is the lazy girl's pie!)
Directions:
  1. Preheat oven to 425 deg F
  2. In a large bowl, mix flour, brown sugar, butter and cinnamon until well blended but still crumbly. I just used a whisk, but you can use an electric mixer if you want to be even lazier! ;)
  3. With your fingers, press crust mixture in the bottom of ungreased 13x9-inch pan
  4. Combine the filling ingredients (without the apples) in a bowl. Just before you're ready to cover the crust with it the filling, toss the apples with the dry mixture and coat them well.
  5. Spread the filling over the crust and bake for 10 minutes.
  6. While that bakes, in large bowl, mix sugar and cinnamon.
  7. Cut 1 cold unrolled Pillsbury crust lengthwise in half, then cut into 1/4-inch slices.
  8. Separate pieces and toss with cinnamon sugar mixture.
  9. After the 10 minutes, sprinkle cut-up crust mixture evenly over filling.
  10. Bake 18 to 20 minutes more, or until crust is golden brown.

It turned out that we forgot to take the bars to the party, but when we woke up in the morning, they made a delicious breakfast, too! :)

Happy November!
-Erin

Thursday, September 3, 2009

oh, baby.... (peach hand pies)


Two things happened last weekend. One, I dug out my food processor. Two, I was unceremoniously called a 'baby.' For being scared. In a scary movie. (The Descent) This seemed a little uncalled for. You don't call someone hysterical for laughing in a comedy.

I don't think I've been called a 'baby' since elementary school, when my cousin Sam and I would taunt each other back and forth with the hated moniker. We were 15 days apart, so the name carried much consequence. I remember back then, nothing seemed worse than being called a 'baby.' Surprisingly, 15 years later, it still carries a hefty punch.

I've been thinking about fear a lot lately anyway. Most fears I hold onto are irrational...and I've found it helps to ask 'of what consequence are the actual consequences I'm afraid of?' Like...the monster from the Descent is not actually going to come get me. So, it's really of no consequence. It probably didn't warrant screaming at the top of my lungs while other people slept.


Another example, I have a huge mental blockage around making pie crust. But, why? Yes, it's difficult, but the worst that could happen is I could fail, and the consequence is that I've wasted some flour and butter. Not a big deal. This makes the fear fizzle away some.

Deciding to do this blog with Erin has been great for this too. That girl is fearless! My baking is meticulous...reading and re-reading recipes, comparing, measuring. She just goes for it! And she's been an amazing encouragement to me in trying new exciting things, and old scary things. It goes like:

Linda: Oh, I really want to try XYZ! But I'm scared! It looks hard!
Erin: Why? It's awesome! Just do it! It's not that hard!
Linda: Oh...ok!

This is a dramatization because we don't always speak in exclamations points. But I guess sometimes that's all it takes. (See, cooking is like this big, overstated metaphor for life.)

This is all to say, this week Erin and I are making peach hand pies. QFC had a great deal on organic peaches, so I trekked to Capitol Hill on my lunch break and bought a whole bagful. Erin found the idea for hand pies on smittenkitchen, and they looked delectable. So I had to calm my pate brisee fearing heart.


I started baking about a year ago from a copy of Martha Stewart's Baking Handbook. She taught me layer cakes, cupcakes and pie crust in a food processor. At the time, I didn't have a fancy pants food processor, so I went through the painful process of cutting the butter into the flour by hand. With a knife. Oh, what trials I have endured for fresh pie.

Then after I did get my food processor, fancypants included, I never made pie crust with it. I was excited to finally try it this week, but then I read smittenkitchen's post on Pie Crust 102. She recommended a hand held dough cutter instead of the food processor, and promised it made a flakier crust.

Now, I am against one-wonder gadgets. I grew up in a household where you made do with the basics. I'm still amazed at the silly things American people sell (and buy!). An apple corer!!?!? I have one too! It's called a knife. (Or more efficiently, my teeth.) An egg holder?? Why not set your egg down on the plate, sir? Anyway, back when I was making my ghetto piecrusts a year ago, I didn't even have a rolling pin! I used a cold can of Pepsi. Yup. Pretty. Awe. Some.


(Now I have this super gangsta' rolling pin. Thanks to a special someone! See, how fancy my pants do grow.)

All this ranting aside, I really really wanted to make some flaky, melt in your mouth crust. And since this was my big 'conquer your fears' moment, I needed some extra cards stacked in my favor. So on a quest for basil through Pike Place Market, I found myself at Sur la Table, the proud new owner of a dough blender. And let me tell you, it was worth every penny of the eight dollars and Washington state sales tax I forked over for it.
I blended my butter as minimally as possible. Smittenkitchen recommended stopping around pea sized butter pieces.....I stopped at fat, happy nickels. I was on a mission! It took some work to make the dough come together, but the puffy, flaky, incredibly buttery end result was amazing.


When I pulled those babies (ahem) out of the oven, I gave myself a secret handshake of joy. You could see each individual layer of awesomeness around the edge of the pies. And you know what this made me want to do? Make my own puff pastry. Because I'm like Jet. Li. Fearless. But alas...another weekend.

I chalk these pies up under the whopping big success category. I'm sure I'll do greater things with pie crust, but firsts always have their place in a heart. I was afraid of many things...that the crust would be hard, that the whole thing would crack open and burst, but these little pies were docile as peachy, endearing sheep.

I only used half the dough so far, which I baked in two batches of four pies. For the second batch I added mango to the filling, which made an interesting tropical taste. I still have half the dough in my freezer, people! What adventures will I dream up next!? Salmon pie? (Ahem, Derek.)


Peach (Mango) Hand Pies
adapted from smitten kitchen

This recipe may seem a little daunting, but coming out the other side it's really not so bad. You make the dough, chill, roll and cut, chill, fill, chill, bake. The filling is so easy it's negligible. There's downtime for chilling so bring a friend or a book. Plus, for my second batch, I had the dough and filling ready, I woke up one morning, filled four pies, chilled it, baked it and voila! Fresh peach pie!

Basic Martha Stewart Pate Brisee (pie crust dough)
(I used half this to make eight pies. Mathematics tells us that you could use this to make 16 pies or halve it and make eight like me.)
2 1/2 cups flour
1 teaspoon salt
1 teaspoon sugar
2 sticks butter
ice water

Filling
(This filled eight pies. Normal laws of math apply.)
1 large peach, chopped (about 3/4 cup, chopped)
1/8 cup chopped mango
1/8 cup flour
1/8 sugar
1 tsp cinnamon
1/2 tsp nutmeg
1 tsp vanilla

1 egg plus 2 tablespoons water for egg wash
sanding sugar


1. Cut butter into pieces, return to fridge to cool.
2. Sift flour, salt and sugar into bowl. If you are OCD, you can chill this bowl too.
3. Add cold butter to flour bowl (which should be a big, big bowl.) Use your dough blender (!) to cut butter into flour until pea (or nickel) sized pieces of butter are still visible.
4. Slowly add ice water (by tablespoons) to flour and continue until clumps of dough form. Begin working with hands to bring dough together.
(If you feel like the dough is not coming together, add more water. If you try a few times and it starts getting warm, take a breather and return the bowl to the fridge. Do not warm up that butter.)
5. After dough forms into a ball, split into two pieces and wrap in plastic wrap, form into discs and return to fridge to cool for at least 30 minutes.
6. Remove one disc, and on a heavily floured counter, roll out to 1/8 inch thickness. If you want to be successful here, just add tons of dry flour to the top and bottom of your disc. It doesn't hurt your dough.
7. Use something with a four inch diameter to cut rounds out of your dough. I used a little cereal bowl. Or, you can cut squares and fold along the diagonal like turnovers. Transfer your rounds to prepared parchment lined cookie sheet and quickly return to fridge to chill 30 minutes.
8. Meanwhile, make filling by mixing fruit, flour, sugar and spices.
9. Fill rounds with peach filling, wet half of the edge with water and fold to seal. Indent edges with fork if you're into cute stuff like that. Chill.
10. Brush pies with egg wash. Cut a slit in each so they can breathe when baking. Dust with sanding sugar, if you have it.
11. Bake 20 minutes at 375 degrees.
12. Bask in awesomeness. (Actually, remove to wire rack and cool.)


Related Posts Plugin for WordPress, Blogger...