Monday, October 26, 2009

Pumpkin Black Bean Soup

Woah...is it just me, or did October go flying by? Halloween is nearly upon us! This week, for FHE, we had a pumpkin fest: we carved some pumpkins, made pumpkin olive oil bread, and a delicious pumpkin black bean soup! Inspired by the season (and a cupboard stocked with pumpkin puree), this pumpkin soup was perfect for our pumpkin carving night because it got to simmer on the stove in a big heavy pot, while we got our hands dirty digging into pumpkin flesh.

In fact, this big black pot definitely resembles a cauldron. We're clearly getting into the Halloween spirit! But Halloween aside, this soup definitely needs to make it into your repertoire. It's hearty with a chili-like consistency, not-too-pumpkin-y (it really should be called Black Bean soup with a hint of pumpkin, but hey, this is October!), and it really warms you on a drafty night like this one.


Did I mention that it's SO EASY? Throw some delicious combination of spices and veggies in a pot, simmer, and enjoy! Plus, this is a veggie version, for when your vegetarian best friend comes to dinner (Hi Tracie!).

Pumpkin Black Bean Soup
  • 2 tbsp olive oil
  • 1 1/2 c. chopped onion
  • 4 garlic cloves, minced
  • 1 tbsp ground cumin
  • 1 tsp cayenne pepper
  • 1/2 tsp ground black pepper
  • 3 cans black beans, rinsed and drained
  • 1 c. drained canned diced tomatoes
  • 4 c. vegetable stock
  • 1 can pumpkin puree
  • 1/2 cup dry white wine (I used a cabernet sauvignon)
  • Sour cream to garnish
  • Roasted pumpkin seeds to garnish (if available)
  1. In a large heavy pot cook onion, garlic, cumin, chili powder, and pepper in oil over moderate heat, stirring, until onion is softened and beginning to brown.
  2. Stir in black beans, tomatoes, stock, pumpkin, and wine until combined and simmer, uncovered, stirring occasionally, 25 minutes, or until thick enough to coat the back of a spoon
  3. Serve soup garnished with sour cream and toasted pumpkin seeds
Why not make tonight your own pumpkin-fest?
-Erin

And for good measure, here are the pumpkins we carved tonight: Che and Batman!

Sunday, October 25, 2009

Carrot Cake Cupcakes

First off, a small order of business: Linda is on vacation, so you get me for the next week or so. Get ready ;)

On Friday, my dad called me when I was at work requesting that I make him a dessert for our tailgate on Saturday. Of course, he picked his absolute favorite: carrot cake. So much in fact, that carrot cake was the top layer of my parent's wedding cake. And my dad is super critical of carrot cakes. He claims almost every so-called 'carrot cake' he eats is not actually a carrot cake, but a spice cake. I don't know that I've ever actually had a spice cake, but I knew that I needed to make this carrot cake distinct enough that he couldn't claim it to be otherwise. But no pressure, Erin...

So I spent some time searching the internet for The Perfect Carrot Cake recipe. I found several good ones, but of course, the one that caught my eye just happened to reference the Smitten Kitchen. Why didn't I go to Deb right off the bat? Call it a lapse in judgement, or chalk it up to temporary insanity, but I'll probably not make that mistake again.


I got three big beautiful carrots, pureed them in the food processor, and took photos as evidence for my dad, in case he claimed the cupcakes were spice cake. But lucky for me, no such claim was made. In fact, he loved them! He said that it was the best carrot cake that he's ever had. (Let's take a minute to let that sink in. My dad, the carrot cake aficionado, had no complaints! Ultimate victory!) He particularly liked the maple cream cheese frosting - how it was not too sweet or too thick, and it complemented the carrot cake flavor perfectly.


With this happy bite, I felt a huge wave of relief. Dad, if you read this, feel free to make phone orders any time. I'm ready for you :)


Carrot Cake Cupcakes
Adapted from Smitten Kitchen
makes 24 cupcakes
  • 2 c. flour
  • 2 tsp baking soda
  • 1 tsp salt
  • 2 tsp cinnamon
  • 1/2 tsp ground nutmeg
  • 1 tsp ground ginger
  • 2 c. sugar
  • 1 1/4 c. canola oil
  • 4 eggs
  • 3 c. grated/pureed peeled carrots
  • 1 c. coarsely chopped walnuts (optional)
  1. Preheat oven to 350 deg F.
  2. Mix flour, baking soda, salt, cinnamon, nutmeg and ginger in a bowl and set aside.
  3. Whisk sugar and oil in large bowl until well blended.
  4. Whisk in eggs, one at a time.
  5. Add flour mixture and stir until blended.
  6. Stir in carrots and walnuts (if using them)
  7. Divide batter among cupcake molds, filling 3/4 of each
  8. Bake cupcakes 14 to 18 minutes, or until a tester inserted into the center of one comes out clean. 16 minutes was perfect for me.
  9. Let cool in pans for five minutes or so, then transfer cakes to a cooling rack. Let cool completely before icing them.
Maple Cream Cheese Frosting
  • Two (8 oz.) packages cream cheese, softened
  • 1 stick unsalted butter, room temperature
  • 1-2 c. powdered sugar (depending on how sweet you want the frosting. I used 1.5 cups)
  • 1/4 c. pure maple syrup
In a stand mixer (or with a hand mixer) beat all the ingredients on medium until fluffy. Chill the frosting for 10 to 20 minutes, until it has set up enough to spread smoothly.


Happy Carrot Cake!!
-Erin

Tuesday, October 20, 2009

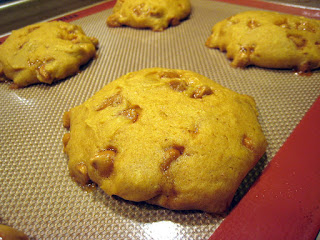
Pumpkin Butterscotch Cookies

I have the best mom in the whole world. After reading my rant about Safeway not carrying canned pumpkin, she showed up at my door with 3 cans of the delicious puree! How great is she? (p.s. Safeway totally has canned pumpkin now...I have evidence below). So of course, now that I am stocked with pumpkin, and October is quickly coming to a close (seriously, where did this month go?), it is time for another pumpkin recipe.

Here's the thing about pumpkin: it is a delicious food, but to me, I can never imagine doing anything with it besides plain ol' pumpkin pie. But pumpkin continually surprises me with the flavors that it pairs with. Pumpkin and chocolate had me skeptical enough, but pumpkin and butterscotch? That sounded like pure witchcraft -- and these cookies surely put a spell on me!

Now, as soon as the cookies came out of the oven, they were beautiful. Puffy, cakey, and oozing with butterscotch. I had to try one (ok three...) immediately, and Suzie walks into the kitchen, sees me double-fisting these cookies and all I could do was look at her sheepishly and offer her one. She took half a cookie, tasted it, experienced the same euphoria that I did, and then grabbed for the other half. These were some yummy cookies! I had thought that I would give these cookies to our neighbors as a thank you present...but after trying them, I knew that there was a time to be generous and a time to be selfish. Cookies this good bring out my selfish side: I was NOT sharing.


Pumpkin Butterscotch Cookies
Makes about 20 cookies
  • 2 c. flour
  • 1 1/2 tsp baking powder
  • 1 tsp soda
  • 1/2 tsp salt
  • 1 tsp cinnamon
  • 2 eggs
  • 1 c. sugar
  • 1/2 c. canola oil
  • 1 c. canned pumpkin
  • 1 tsp vanilla extract
  • 1 c. butterscotch chips
  1. Preheat oven to 325 deg F.
  2. Mix the flour, baking powder, baking soda, salt and cinnamon together in a bowl and set aside
  3. In a large bowl, using an electric mixer on medium speed, beat the eggs and sugar until smooth, about 1 minute.
  4. On low speed, mix the oil, pumpkin, and vanilla until blended.
  5. Mix in the flour mixture to incorporate it.
  6. Mix in the butterscotch chips.
  7. Use an ice cream scoop to scoop mounds of dough on baking sheets lined with parchment paper, spaced at least 2 inches apart.
  8. Bake for about 16 minutes, or until the tops feel firm.
  9. Cool on the baking sheet for 5 minutes, then transfer to a wire rack to cool completely (or eat immediately because they are SO good!)

Saturday, October 17, 2009

Pretty Pink Peach Raspberry Cake

This weekend is my roommate Suzie's birthday, which means a few things: (1) a fabulous night on the town, (2) a life-size cutout of Edward Cullen*, and (3) a BIG PINK CAKE.

Suzie LOVES pink. If someone walked into our house and into her room, they would probably believe that a 12 year old girl lived there. The entire room is bright pink (well, the walls are purple, but that still fits the bill) - pink sheets, pink comforter, pink chairs, pink rugs, a big pink mirror, etc. So when I asked her what kind of cake she wanted for her 13th (*ahem 24th) birthday, the only requirement was that it be pink. And pink it shall be!

In the best cake book in the entire world, there are so many amazing cakes. So good, in fact, that I used a hybrid of recipes and fillings from this book when I made my friends' wedding cake in July. This is some serious stuff, people. So it is my go-to when I need a big cake to celebrate in a big way, and birthdays are no exception!

Though the cake sounded amazing at first glance, I was hesitant to make it because it's not peach season anymore (I missed that delicious boat). But quite perfectly, you can substitute frozen peaches and frozen raspberries, so this yummy fruity cake can be made all year round! Fresh peaches would be worth trying in the future, but we have to take what we can get in mid-October.

Plus, reading the recipe, the cake uses a staggering 3 cups of heavy cream! Keep in mind item #1 folks, this cake was meant to be served before a fabulous night on the town (read: we girls needed to fit into small dresses). But quite surprisingly, this cake actually contains less fat than many desserts because it doesn't use butter. This cake wins!

Oh boy, does it win. The cake itself is so light, and the chilled mousse-like filling and frosting made each bite even better than the last. All of our party guests were in total bliss while eating their piece(s). It made me really regret waiting so long to make this cake. It is so good, you really should not wait for a big girly** birthday celebration, but rather, call up your neighbors and ivite them over to celebrate the fact that, hey it's Tuesday and you just happen to have made a big beautiful pink cake.

Peach Melba Cake with Raspberry Cream
Adapted from Sky High

Cream Cake
(it can be made a day ahead and wrapped in plastic wrap and stored in the fridge - I did it, and it worked perfectly)
  • 1 3/4 c. cake flour (honestly, I used cake flour because I had it on hand from the wedding cake, but if I didn't, I'd probably just use all-purpose...I don't think it makes that much difference)
  • 3 3/4 tsp baking powder
  • 1/2 tsp salt
  • 1 c. heavy cream
  • 2 tsp. vanilla extract
  • 1 1/4 c. sugar
  • 2 whole eggs
  • 2 egg yolks (and do you know what that means? you have egg whites for an omlette or merengues!)
  1. Preheat the oven to 350 deg F.
  2. Oil and line with parchment paper three 8" or 9" round pans (do people actually own BOTH 8" AND 9" pans? I use my 9" pans for every cake. This recipe calls for 8" but I think it is just silly to own so many sets of pans!)
  3. Mix together flour, baking powder and salt in a medium bowl.
  4. With a mixer (hand or stand) whisk the cream and vanilla until the mixture forms soft peaks. Reduce the mixer speed to low and slowly add the sugar. Then add the whole eggs and egg yolks and continue mixing until the batter again forms soft peaks.
  5. By hand, fold into the wet mixture about 1/3 of the dry ingredients. Repeat until all of the dry ingredients are added.
  6. Divide the batter among the 3 pans and bake for 18-20 minutes.
  7. Allow to cool in pans for 10 minutes, then invert them onto wire racks and allow to cool completely.
Peach Mousse Filling
  • 1/4 c. plus 2/3 c. sugar
  • 3/4 c. water
  • 1/4 c. plus 2 tbsp peach liqueur or schnapps
  • 1 pound peaches, peeled and pitted fresh or thawed frozen with juices
  • 1 tbsp freshly squeezed lemon juice
  • 1 tbsp unflavored gelatin powder (like Knox - also, if you live within driving distance, and want some gelatin, I now have SO many packets...please take some!)
  • 1 c. heavy cream
  1. Put 1/2 c. water and 1/4 c. sugar into a small saucepan over medium heat
  2. Bring to a simmer, stirring to dissolve the sugar. Continue to cook until the syrup is reduced to about 1/2 cup.
  3. Remove from heat and stir in 1/4 c. of the peach liqueur and set aside
  4. For the peach mousse, put the (thawed) peaches, 3/4 c. sugar, the lemon juice and the rest (1/4 c.) of the water into a medium saucepan.
  5. Bring to a boil and then reduce heat and simmer until the peaches are soft
  6. Put peach mixture (careful, it's hot!) into a blender and puree until smooth
  7. Measure out 1 cup of the peach puree and set aside. Put the remaining puree into a large mixing bowl and allow to cool (the original recipe omitted this tiny step...and when I went to fold in the whipped cream, the mixture melted and was not firm enough to stay between the cake layers, oozing out, as shown in the beautifully ugly photo below)
  8. Soak the gelatin in 2 tbsp of peach liqueur for about 5 minutes, then heat in the microwave for 10 seconds, stir to combine and then whisk into the peach puree in the bowl
  9. Whip the cream until it holds soft peaks, then fold into the COOLED peach puree mixture.


Assemble the Cake
  1. Put the first layer flat side up on a serving plate.
  2. Pour 1/4 c. of the peach simple syrup over the layer
  3. Spread 1/2 of the peach mousse on top of the layer
  4. Place the next cake layer on top of the mousse (hopefully it's firm, otherwise you can scrape off the overspill to salvage the cake, and have a tasty treat)
  5. Pour another 1/4 c. of the peach simple syrup over the 2nd layer, and spread the rest of the peach mousse on top
  6. Place the final layer on top of the mousse, and pour the remaining simple syrup on top.
  7. Cover with plastic wrap and refrigerate for about an hour

Raspberry Frosting
  • 12 oz. unsweetened frozen raspberries, thawed, with the juices, or if in season, fresh raspberries
  • 1 c. heavy cream
  • 1/4 c. sugar
  • 1 tsp water
  1. Put the raspberries and their juices in a medium saucepan and cook over medium-low heat, mashing the berries with a large spoon, until they give up all their juices, about 15 minutes
  2. Let cool, then puree in a blender
  3. Strain through a sieve to remove the seeds. There should be about 1 c. of the raspberry puree.
  4. In another bowl, whip the cream until stiff.
  5. Measure 1/3 c. of the raspberry puree into another bowl and to it, add the sugar and water and stir until the sugar dissolves.
  6. Fold in the whipped cream. (Yay it's now pink!)
  7. Sweeten the remaining raspberry puree with additional sugar to taste and use for garnish
  8. Frost the cake with the pink raspberry whipped cream and then refrigerate for another hour (or as long as you can stand)
  9. When serving, put a small amount of the excess peach puree and raspberry puree on each plate for a striking (and delicious) presentation


*Edward Cullen is the main vampire in the Twilight Series. Though she won't publicly admit it, Suzie LOVES him...so when we saw a life-size cutout of him at Nordstroms, I knew that she had to have it. I may have snuck into her room while she was sleeping on the night before her birthday and put it next to her bed for her to wake up to in the morning :)
**All of the men in attendance also loved this cake. Deliciousness does NOT discriminate based on sex.

Wednesday, October 14, 2009

brunch


I just had the best weekend. In fact, it was so good, I'm still recovering from all the goodness. Erin finally came from San Francisco, and not only that, but Erica came from Chicago, Penny and David from Portland (albeit separately), old and new friends came from Seattle, and together they came as a wonderful brunch-consuming whirlwind through my sunny Saturday apartment. I'm exhausted, but oh so happy.

In her last post, Erin wrote a little about how she and I met. I'll elaborate a little on how we took our relationship to the next level. One day, as Linda was working (read: flipping through Facebook photos), she came across a photo of Erin standing next to a large, large cake. Linda immediately G-chatted Erin:

Linda: Erin, you know that picture of you and the cake?
Erin: Yes.
Linda: Did you make that cake?
Erin: Yes.

Linda: ♥

The rest is, as they say, history.


We started talking about this brunch as soon as Erin booked her ticket, but the real planning didn't start until last week. It was the first time I would be making food for over 15 people, so I was nervous and unsure how much we would need. I'm not saying stressed, but yeah, some other people might be saying that. To add to the food quantity (and quality), Erin baked an amazing challah and brought it with her from San Francisco. I don't think life can get much better than friends bearing freshly baked bread flying in to visit you.

I started baking in earnest on Friday night, but then, as Erica and I were mixing cookie batter, the unthinkable happened: my electric hand mixer broke. I still had plans to make frosting, cupcakes, and about a million other things, but without an electric mixer, I was lost. Luckily, Erin and David arrived soon after and we were forced to leave the apartment and have fun. But come Saturday morning, I ran to Sur la Table, came out clutching a new parsley green hand mixer, and rushed passed on-lookers with a look of determination that said, Yes, indeed my oven is still going upstairs.

Here's my new mixer in action.


You might be wondering why I don't have a stand mixer. You wouldn't be the only one. This weekend, I had the good fortune to invite fellow food blogger, Judy, of the fabulous Domestic Goddess Adventures blog. She came and gave me a good talking-to about the merits of a stand mixer. And she has the credentials to back it up: she makes swiss meringue buttercream like some people boil eggs, and I shamelessly stole one of her recipes for this brunch. And yes, my arm was getting a little sore from the hand mixer.

What am I waiting for? Well, it could be that I'm just waiting to meet a music composing food loving New Yorker who falls in love with me through my blog and then mails me a vintage KitchenAid mixer he found in Manhattan as a courtship gift. Or it could be my new found fear of accumulating more and more stuff (seriously what is the upper limit here?). Or it could be that I'm waiting for the moment I find $300 to coincide with a Macy's home sale. We will have to see.

After a lovely Saturday morning of cooking and baking, people started filtering in around 11, and the last left after five. We, of the apartment, ate through it all. Karman had the first crack at the french toast, and the image of him, clutching his plate of french toast, sputtering to find words with which to compliment Erin in between big joyful bites still cracks me up. Some people claim to have gotten a little tipsy from four+ mimosas. I was so busy eating and forcing everyone else to eat that I utterly forgot to take enough pictures. But even without picture proof, I think everyone had a good time.

Anyway, because of the mixer hiccup, I didn't get to make as much food as I initially intended. But as it turns out, as much food as I initially intended would have been utterly ridiculous, so it must be that all things happen for a reason.

Here's the menu we ended up with:

brunch
red velvet cupcakes with cream cheese frosting
brown butter pumpkin cupcakes with salted caramel swiss meringue buttercream
apple spice cupcakes with salted caramel swiss meringue buttercream
cinnamon french toast made from homemade challah
salmon cream cheese handpies
apple galette
toffee apple upsidedown cake
egg salad
leek and purple potato pie
crudites
orzo salad with arugula, basil and cherries
zucchini bread, courtesy of Holly
cheddar scones, courtesy of Penny
fruit salad, courtesy of Erika
two quiches, courtesy of Nick
fresh whipped cream

to drink:
mimosas, courtesy of Holly and Zach
milk
coffee


Erica and I counted, and it seems that with all the comings and goings, the food ended up feeding 18 people. But after everyone left, there was still plenty! We ended up munching on it throughout the evening festivities and it still served as the base for a large breakfast spread the following morning.

It was a lot of food. And people seemed to like it enough. The french toast was incredible, and I can't wait to try the challah myself. The salmon handpies were popular, but I personally loved the brown butter in the pumpkin cupcakes. The apple galette recipe is one I stole from smitten kitchen, and the leek and potato pie a sort of last minute invention to use up some purple potatoes Penny gave me.

After everyone left Sunday, I got hit by a big bout of lazy that must have been lurking in my closet. Good thing I still have leftovers. But I promise to emerge from my listless couch-bound state soon to post some of these recipes!


There's talk of a San Francisco weekend in the future. I can't imagine anything better.

Friday, October 9, 2009

Easy Challah

I am so excited right now…! Today, I am jet-setting to Seattle, where I get to stay with Linda and have an ultimate foodie weekend! PacificThyme is coming together at last! We met a little over a year ago at “New Hire School,” the introductory training program that all employees of our company go through. We hit it off at training, then went back to our respective offices (San Francisco and Seattle) and kept in touch. When we decided to start this food blog, it had been about a year since we had met, and we knew that we needed to see each other again. And the idea for this weekend was born!

And boy, do we have plans.

A few other friends will be in town too, so to celebrate, we are throwing a Big Saturday Brunch. The menu planning has been a little overwhelming, to say the least, but we’ve had fun tossing different ideas back and forth. I am excited to share one in particular: Challah French Toast.

Now, I love bread, but it used to really intimidate me. A friend in college had a bread machine, and she would always be making fresh, hot bread. But I don’t own a bread machine, so how could I possibly make my own bread? Then I met Challah. And Challah is now pleased to meet you!

This beautiful braided bread is so easy to make! No fancy bread machine is needed, not even a stand mixer! You just need a big bowl, a big spoon, and a quick braiding lesson. You don’t even have to knead this for long, just a minute or so until it is smooth. Incredibly easy! Now, Challah is a traditional Jewish bread, but this Catholic girl has gladly adopted it. Bread this wonderful is meant to be shared and loved by all.

When you bake this golden, eggy bread, the smell will envelop your kitchen and hang around all day, putting you into an incomparable state of bread happiness. It makes perfect French Toast after a day or so, that is, if you can restrain yourself enough to have some Challah left over. But that’s what double batches are for, right?

Easy Challah
From The Smitten Kitchen
Makes 2 loaves (you’ll want both, believe me)
  • 1 1/2 packages active dry yeast (1 1/2 tbsp)
  • 1 tbsp plus 1/2 c. sugar
  • 1/2 c. olive oil
  • 5 large eggs
  • 1 tbsp salt
  • 8 to 8 1/2 c. flour
In a large bowl, mix yeast, and 1 tbsp sugar with 1 ¼ cups lukewarm water to dissolve. Then add remaining sugar and olive oil. Beat 4 eggs in 1 at a time. Slowly add the flour, mixing until it all comes together. The dough should not be sticky – add more flour if it is.

On a floured countertop, knead the dough until smooth, then place into a large oiled bowl. Cover the bowl with plastic wrap and let rise in a warm place for 1 hour, or until the dough has doubled in size. Punch down the dough, recover the bowl, and let sit for another 30 minutes.

After 30 minutes, take half of the dough and divide it into 6 balls. Roll the balls into 6 long snake-like strips and place them parallel to each other on a large cookie sheet lined with parchment paper. Gather the strips together at one end. Now comes the fun! Braiding Challah is actually very easy, if you know the trick. Are you ready?

Over two, under one, over two. That’s it!

Working from right to left, take the rightmost strip, wrap it over two strips, under one strip, and over the last two strips. Tada! Repeat! Take the rightmost strip, wrap it over two strips, under one strip, and over the last two strips. Repeat until you can braid no more, and tuck the ends under the braided loaf. Isn’t it pretty?

Repeat for the second loaf. You now have two beautiful braided loaves!

Beat the remaining egg and brush over the tops of the loaves, and let rise for 1 hour. After about 50 minutes, preheat your oven to 375 deg F.

Brush the tops of the loaves with another coat of egg, then bake for 40-50 minutes. (Revel in the wonderful fresh bread smell!) Remove from the oven and let cool on a rack until you can’t stand it anymore and have to have some delicious bread.

One of my loaves is on its way up to Seattle with me, to be turned into French Toast on Saturday morning. I can’t wait!

Wednesday, October 7, 2009

Make Your Own Girl Scout Cookies (Samoas!)


I know what you're thinking - Girl Scout cookies should not be tampered with. These little colorful boxes of perfection couldn't possibly be improved upon...could they? Plus, it's not even Girl Scout Cookie Season! (January - March...but who's counting?)


But let me tell you - if you haven't learned enough already that things made at home are much better than store-bought, then get ready for Samoas. Or as I have always called them, Caramel deLites (it depends on where you live, apparently, what they are named...but they are the same delicious cookie). Caramel, chocolate, coconut and cookie - does it get any better?

This was definitely a time consuming cookie. A bit ambitious for a Tuesday night after soccer practice, but Wednesday was my company team's final game, and I wanted to bring something to help celebrate. So be prepared to spend a good couple of hours cutting out cookies, melting caramel and chocolate, and making delicious little replicas of the cookies we all know and love, except better because you made them! Just take your time and have fun with them - the results are worth it!

My roommate, upon trying the cookie, said "those are the cookies that God eats." Is there a better compliment than that? Come Girl Scout Cookie Season, it would be fun to do a side-by-side taste test... I will have to enlist my mom - Caramel deLites are her favorite!

Samoas (aka Caramel deLites)
Adapted from Baking Bites

Cookies
  • 1 c. butter, softened
  • 1/2 c. sugar
  • 2 c. flour
  • 1/4 tsp baking soda
  • 1/2 tsp salt
  • 1/2 tsp vanilla
  • up to 2 tbsp milk (I didn't actually need to add milk to my dough)
Preheat oven to 350 deg F.
In a large mixing bowl, cream together butter and sugar. Then mix in flour, baking powder and salt at a low speed, followed by the vanilla and milk, adding in the milk only as needed to make the dough come together without being sticky (it’s possible you might not need to add milk at all, I didn't). The dough should come together into a soft ball. Add in a bit of extra flour if your dough is sticky.

Roll the dough (working in two or three batches) out between pieces of wax or parchment paper to about 1/4-inch thickness (or slightly less) and use a 1 1/2-inch cookie cutter to make rounds (surprisingly, I don't actually own any cookie cutters! I used a lid to a jar of honey, and it worked perfectly.) Place on a parchment lined baking sheet and use a knife, or the end of a wide straw (a boba straw was great for this), to cut a smaller center hole. Repeat until the dough is all used (it's okay to re-roll, this dough is very forgiving (read: buttery)).

Bake cookies for 10-12 minutes, until bottoms are very lightly browned.
Cool for a few minutes on the baking sheet to firm then transfer to a wire rack to cool completely.

Topping
  • 3 c. sweetened shredded coconut, toasted
  • 11 oz chewy caramels (I say 11 oz because I got two 5.5 oz bags of Werther's Chewy Caramels)
  • 1/4 tsp salt
  • 3 tbsp milk
  • 16 oz semisweet or dark chocolate (I used one whole bag of chocolate chips just for the dipping, and then had to run out and get another bag to top the cookies! I used half of the new bag for the topping)
Preheat oven to 300 deg F.
Spread coconut evenly on a baking sheet (preferably one with sides) and toast 20 minutes, stirring every 5 minutes, until coconut is golden. Set aside.


Unwrap the caramels and place in a large microwave-safe bowl with milk and salt. Cook on high for 3-4 minutes, stopping to stir a few times to help the caramel melt. When smooth, fold in toasted coconut with a spatula.


Using the spatula or a small spoon, spread topping on cooled cookies, using about 2-3 tsp per cookie. Reheat caramel for a few seconds in the microwave if it gets too firm to work with. [NOTE: this is tricky - the caramel needs to be warm to work with, but it will be hot out of the microwave, so BE CAREFUL. I definitely burned my fingers spreading the caramel mixture on these cookies.]

While topping sets, melt chocolate in a small bowl. Dip the base of each cookie into the chocolate and place on a clean piece of parchment paper. Transfer all remaining chocolate (or melt additional chocolate, if necessary) into a piping bag or a ziplock bag with the corner snipped off and drizzle finished cookies with chocolate.

Let chocolate set completely before storing in an airtight container.

Makes about 3 1/2-4 dozen cookies.

Also, if you want recipes for more Girl Scout Cookies, you should check these out:

Saturday, October 3, 2009

mushroom rosemary omelette


I love making breakfast. It makes weekend mornings that much more special when you can take time, flip pancakes, grill bacon, or chop a bunch of mushrooms for an omelette. Although let's be serious, I make every effort to do this on weekdays too.

Omelettes are a magical thing. I didn't grow up eating them. When I started seeing them in restaurants, I was perplexed by how they were made. How do you get all that stuff in there while the egg is cooking? How does it make a perfect little roll? I made a few feeble home attempts and then didn't try again for a long time. I had made risotto, pies and paella, smiled and didn't object to being called an 'accomplished home cook,' and all the while I harbored a dirty little secret: I couldn't even make a simple omelette. It's a bit like a magician's sleight of hand; dazzle 'em with pancakes and crepes and muffins in one hand and they'll never notice the lack of omelette in the other.

Well those days of dishonesty are in the past. 2009 was the first year of the Obama presidency and the year I learned the secret of the omelette. And it is so simple: low heat. Here's the fail proof technique I use now: add some oil to a non-stick pan and turn the heat up to high. This gets the oil nice and hot, which is important before adding the egg. Then after adding the egg to cover the bottom of the pan, immediately turn the heat to low, and add the toppings across the top while the egg is cooking. Patience is indeed the virtue to invoke here.


Here's a side note on rosemary. Rosemary is terribly underused. It is incredibly versatile, and adds character to baked goods, meats, soups, and now, omelettes. I spent all of last winter roasting sweet potatoes covered in rosemary and it was divine. Combine it with garlic and you'll instantly feel gourmet. It is also an easy herb to always have on hand. If you have any room at all, I recommend you grow your own. It is a hearty plant, and will grow robustly under nearly negligent conditions. Of course, I live in the city and the only plant that has made it through the years with me is a cactus (which is still somewhat of a miracle). But my mother planted some in her suburban garden and it has simply taken over that corner of the yard, no maintenance needed. If you get your hands on some stalks of fresh rosemary, you can leave them out to dry. Once the leaves are dry, I simply scrape them off the stalk and keep them in little jars. Easy peasy. (I'll save you from an essay on my love of mushrooms for now.)


mushroom rosemary omelette
serves 2

Note: Did you know that one egg yolk has the total recommended cholesterol you need for an entire day? I know this is a debbie downer observation, but my family has a history of high cholesterol so now I balk at the idea of eating three whole egg yolks at one sitting. To be fair, if you hid six eggs in a cake, I may act like I've never heard of cholesterol. But the fact of the egg is hard to hide in an omelette, so these are egg white-ish versions.

4 egg whites, (you may want to save the yolks if you have other recipes in mind, maybe...custard?)
2 whole eggs
2 tablespoons water
1/2 teaspoon salt
10 mushrooms, thinly sliced
1 tablespoon fresh or dried rosemary
2 tablespoons olive oil

1. Beat eggs with water vigorously until frothy. Heat non-stick skillet (around 10 inches) over high heat. Add 1 tablespoon oil.
2. When oil is heated through, add half the egg mixture and tilt pan to thinly cover bottom of pan. Turn heat down to low.
3. The top of the egg will slowly begin to set. Add half the mushrooms and rosemary to cover the egg. Continue cooking until egg has entirely set and mushrooms have wilted.
4. Using a flat spatula, carefully lift all the edges of the omelette while tilting the pan. When you're sure that the egg will easily lift from the pan, slide bottom 1/3 of the omelette onto a prepared plate, then turn the pan to create a roll in the top 1/3 while sliding entirely onto the plate. (Yeah I know, this takes a little practice.)
5. Repeat for second omelette. Serve immediately with a sprinkle of rosemary.


Thursday, October 1, 2009

Yummy Pumpkin Cheesecake Brownies

Wednesday was my coworker Joanna's birthday. I usually bring something to celebrate such occasions, but I was having trouble deciding what to bake this time. We've had cookies, pie, and even bread, but I was not really inspired by any of those options...

Inspiration definitely hit when I stumbled upon a recipe for Pumpkin Cheesecake Brownies just two days ago - I just couldn't get it out of my head! I had to make them. Yum!

[Side rant: I went to my neighborhood Safeway to get the ingredients for these brownies, and I was disappointed.yet.again. (remember when they didn't have bread flour?) All I wanted was some canned pumpkin. Seems simple, right? But apparently, according to two separate employees, "they discontinued canned pumpkin." Excuse me? Discontinued? I was shocked and asked how they expect people to make pumpkin pie?! They shrugged and said they hope "they" start making it again before Thanksgiving. Are you serious, Safeway? Do I need to call Libby's and file a complaint? I find it very hard to believe that canned pumpkin has been discontinued forever. What kind of excuse is that? Safeway, you are running out of chances in my book. If you weren't a block away from my house, I would never go back again.]

No canned pumpkin. No. Canned. Pumpkin. How the heck was I supposed to make these delicious brownies?! I had already set my mind on making them. I had to have them. So I did something very uncharacteristic of a lazy and impatient baker: I got desperate and I bought a real-live whole pumpkin, roasted it, then pureed it.

I know. I surprise even myself sometimes...

So much extra effort! But it was worth it. And I even got to enjoy roasted pumpkin seeds as a byproduct!


Pumpkin married with chocolate and cheesecake...mmmmm! These brownies were a huge hit. Even Joanna, who as it turns out, doesn't like pumpkin OR cheesecake, really loved the brownies! They are the perfect way to welcome the fall (or celebrate a special 25th birthday!)

Pumpkin Cheesecake Brownies
Adapted from Beantown Baker

Brownies
  • 3/4 c. melted butter
  • 1 c. sugar
  • 2 tsp vanilla
  • 2 eggs
  • 1/2 c. flour
  • 1/2 c. cocoa powder
  • 1/4 tsp salt
  • 2 tsp cinnamon
Cheesecake
  • 8oz pkg cream cheese, softened
  • 1 egg
  • 1/2 c. sugar
  • 1/2 c. pumpkin puree (I hope they didn't "discontinue" canned pumpkin at your grocery store)
  • 1/4 tsp vanilla
  • 2/3 tsp cinnamon
  • 1/3 tsp ground cloves
  • 1/3 tsp ground ginger
Preheat oven to 350 deg F. Grease an 8x8" square pan (I also lined with parchment paper)

For the brownie batter: beat together melted butter, sugar and vanilla, then add the eggs. Mix the dry ingredients together, then stir into the butter mixture with a spoon.

Beat together the cheesecake batter ingredients in a separate bowl.

Spread about 2/3 of the brownie batter into the pan, then pour the cheesecake batter over it. Spoon the rest of the brownie batter over the cheesecake batter. Swirl the dark and light batters together with a knife (Looks seem to be important with this recipe, but even though my swirls didn't turn out to be so pretty, the brownies were YUMMY)

Bake for 40 minutes, or until center is set. Cool completely on wire rack, then chill for a couple of hours (or overnight) before cutting and serving.
Related Posts Plugin for WordPress, Blogger...